This page updated 5 May 2009
Version note: Applies to Second Site 6 & 7
Second Site by default creates name indexes for everyone included in the site. There is also an option to create charts, such as ancestor or descendant charts, with each name on the charts being a clickable link to the page for that person. These tools, together with the links for every name that appears in the narratives, provide a variety of means for your readers to navigate through the site.
One of the useful applications I see for Second Site is to create personalized webpages to share with close members of the family, many of whom have limited interest in our family history. Like most families, we have our share of ancestors, or at least "in-laws," who are interesting because of when or where they lived, their place in history, or just because we are lucky enough to have some some good stories about them. It occurs to me that my semi-interested siblings and cousins would appreciate an easy way to find the "good parts." This article discusses creating a special index of "Notable Ancestors," "Outlaw Relatives," or any other group that one might care to highlight with a special listing.
For an example of such an index, see my Sample family webpages and click on the link for "Special People."
There are two methods available to create such an index:
|
Advantages |
Disadvantages |
|
|
|
Advantages |
Disadvantages |
|
|
The choice between them should probably be based on which of the features are most significant to the user. In general, I would suggest that long lists of people might be easier using the Index Person method while shorter lists may be simpler using the Custom Page method.
Creating an index with this method is a two step process. First you create an artificial "index person" in your TMG Data Set, and add tags to link each real person you want to appear in the "index person." Then you use the custom index capability in Second Site to create the index.
To create the "index person" in TMG, add an unrelated artificial person, and give that "person" a recognizable name, like "Index Person." If you will be creating different indexes for different sites, say for different family lines, create a separate index person for each. For example "Smith Index" and "Jones Index."
After creating the Index Person custom Tags are attached to that person to create the individual entries in the index. I created two custom Tag Types for this purpose. Both Tag Types are described below. For help with creating custom tags, see my article Modifying Tag Sentence Structures; for help with creating custom Roles, see my Roles Tutorial.
The IndexName Tag creates the actual entries that will appear in the index. Each IndexName Tag creates one entry, that is one name, in the finished index. Each tag will have two principals – the Index Person and the real person who is to be the subject of the index entry. The text of the description that goes with each person is placed in the Memo of the Tag.
The Tag has two Roles because we need different Sentences for the Index Person and the real person. For the Index person we want a Sentence that produces the index entry. For the the real person we want no Sentence so the Tag will not create output in reports if the IndexName Tag is included in the report.
I created somewhat different Roles than suggested by the Second Site Help page for this topic, but either method works well. I just created two custom Roles - with only two Roles, when you assign one, the other is automatically assigned. My Roles, and their Sentence Structures are:
|
Principal
Sentence: |
[:CR:][:CR:][ITAL:]Assign Roles to the [PO] Index Tag!![:ITAL]<[M0]> |
|
Witness
Sentence: |
I ignore it. |
|
Sentence for
Role "IndexEntry:" |
[:CR:][:CR:][PO] -- <[M]> |
|
Sentence for
Role "Person:" |
-- (the double exclusion marker) |
|
Use: |
|
|
Note: |
The strange sentence in the Principal Role is to create a clear reminder (in the webpage) if I fail to apply the other Roles. |
The IndexHeader Tag is used to create the subheadings within the index list. To see what I mean by subheadings, see my Sample family webpages and click on the link to "Index of Special People." This Tag Type is not required if you want a single index listing with no subheadings.
|
Principal
Sentence: |
[:CR:][:CR:][:CR:][BOLD:]<[M]>[:BOLD] |
|
Witness
Sentence: |
I ignore it. |
|
Use: |
|
Here's the Person View of the "Index Person" for my Sample website with the tags entered:
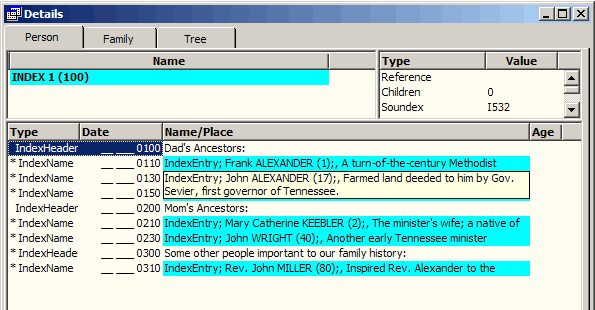
The three IndexHeader tags create the section headings, with the individual entries under them.
Once the "index person" is created, tags added for each person and subheading that is to appear in the index, and sort dates adjusted so each entry is in the desired order in TMG, setting up the index in Second Site is pretty simple. After you have set up your Site Definition File to define the site as you desire, use the Pages > User Items section to add the Index. Click the Add button a the lower edge of that screen to open the Choose User Item Type screen:
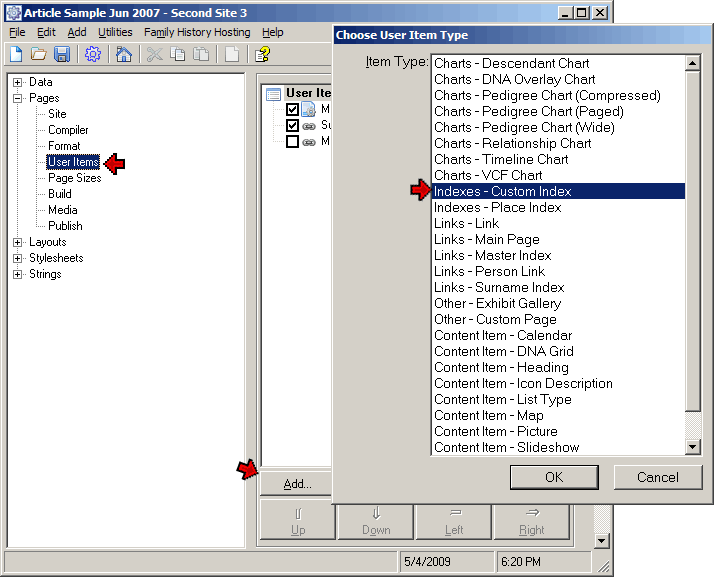
After selecting Indexes - Custom Index from the list, click OK to open the Edit Custom Index screen:
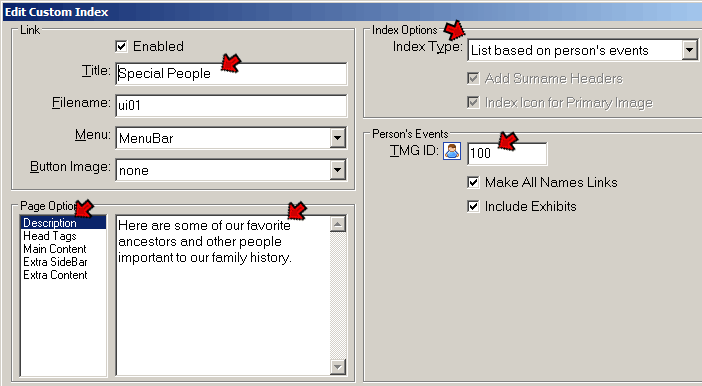
In that screen, enter a helpful title in the Title field - here we entered "Special People." What you enter will appear on the buttons or links to the index. At the lower left, make sure Description is selected, then enter the text you want to appear at the top of the index page in the adjacent field. In the drop down box for Index Type, select "List based on person's events." Finally, enter the TMG ID number of your "index person" in the TMG ID field.
Click OK to close the screen, and create your site. That's all there is to it!
When creating a Notable Ancestors index with this method, the index is defined entirely within Second Site. Using this method, we create a Custom Page which will contain the index, then add the text we want to appear on that page as well as links to each person who is to appear in the index.
You will need to know the names and TMG ID numbers of the people you want to include. Use the Pages > User Items section to add the index. Click the Add button a the lower edge of that screen to open the Choose User Item Type screen:
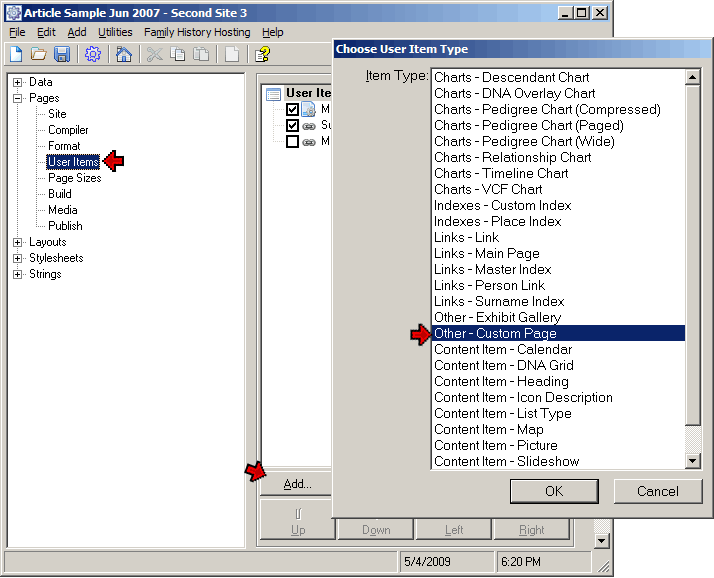
After selecting Other - Custom Page from the list, click OK to open the Edit Custom Page screen:
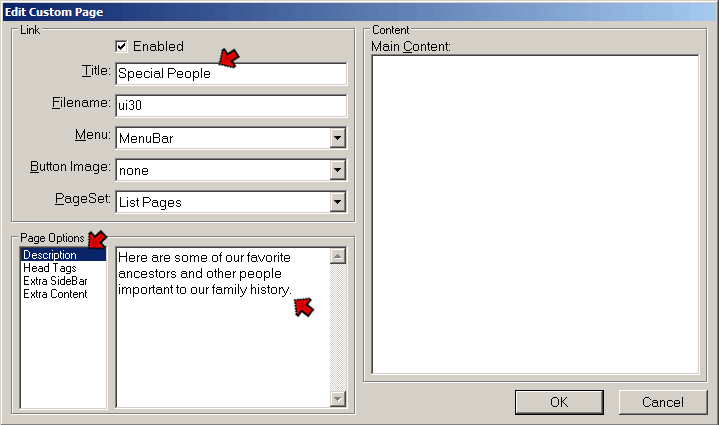
In that screen, enter a helpful title in the Title field - here we entered "Special People." What you enter will appear on the buttons or links to the index. At the lower left, make sure Description is selected, then enter the text you want to appear at the top of the index page in the adjacent field. Click OK to create the Custom Page User Item.
Next we add each person who is to appear in the index to the Custom Page. We do that by selecting the Custom Page we just created, then clicking the Add button to open the Choose User Item Type screen again:
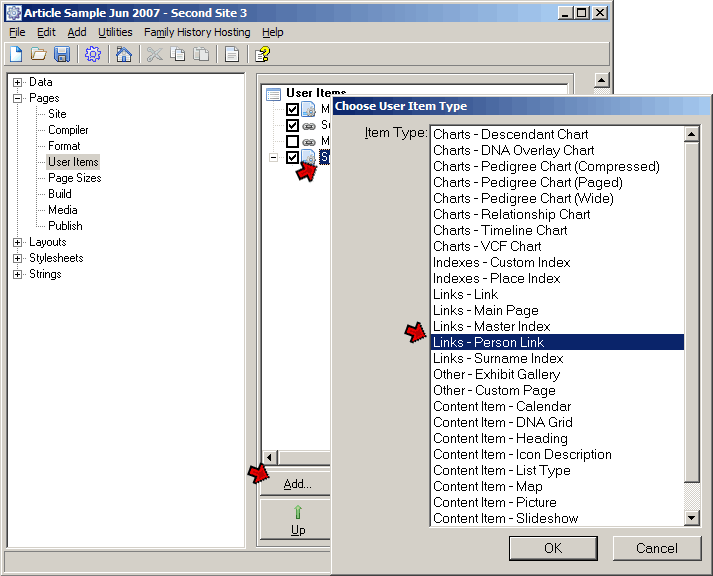
This time we choose Links - Person Link, and click OK to open the Edit Person Link screen:
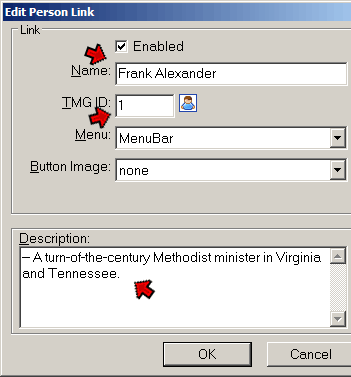
In this screen we enter the name of the first person who is to appear on our index, and his or her TMG ID number. In the Description field we enter whatever we want the index entry to say about this person. Click OK to create the Person Link. Our User Items screen should now look something like this:
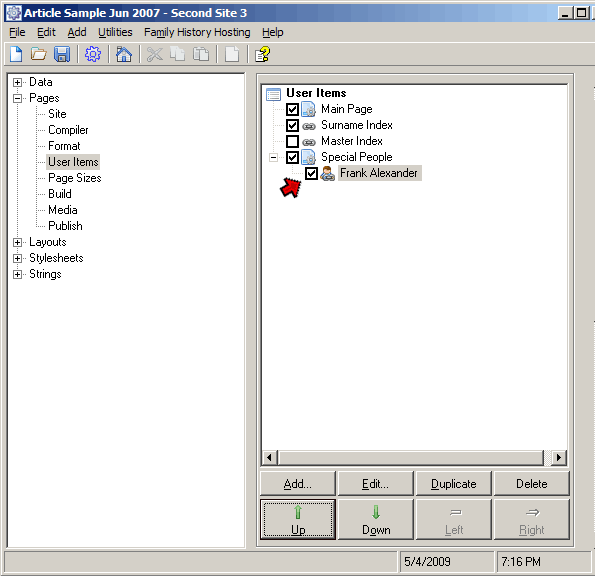
Our Person Link is indented under the Special People Custom Page, showing that it will be part of that page. If it is not located properly, either click and drag it with the mouse, or select it and use the Up, Down, and Right buttons at the bottom of the screen to move it as required.
Once we have created the first Person Link, we add each additional person in our index by creating Person Links for each of them. Either use the Add button as above, or select the first one, click Duplicate to copy it, then click Edit to change the information to that for the next person.
When Person Links have been created for everyone who is to be on the index, we are ready to create the site. Clicking on the menu button that appears on your site will bring up our new index.
That is all that is required to create a basic Notable Ancestors index. The two following sections describe ways to enhance the appearance of the items in the index for those who would like more control over the way the list appears.
If you would like to break the list into sections with sub-headings as I did with the Special People index in my Sample site, you may want to try the methods described in my article on Adding Page Content.
There are two ways you can add a "Notable Ancestors" list to your website to make it more interesting to your readers. The one best suited to your needs depends on a number of factors, including your objectives and available resources. But no matter which method you use, it should help in getting those less than thrilled about reading about "dead people" (as my wife says) to read at least some of your work.
| ReigelRidge Home | Terry's Tips Home | Contact Terry |
Copyright 2000- by Terry Reigel