This page created 24 Jun 2019
Version note: Applies to Gedcom Publisher 1
This article is describes how to use Gedcom Publisher to produce a basic e-book from your genealogical database. Other articles in my Gedcom Publisher Section cover more specific topics about using the program.
|
Topics Included in this Article |
|
| Installing an e-book reader to proof your book as it is developed | |
| Creating the file in which the program settings are saved | |
| Entering the basic data needed to define your e-book | |
| Telling the program where to find your genealogical data | |
| Telling the program to make your book with default settings | |
| Viewing the book you have made | |
Gedcom Publisher creates the files for an e-book, but does not include tools to view the resulting book. Like programs that create webpages from your genealogical database do not include a browser, it expects you to have a viewer installed on your computer. The essential difference is that virtually all computers have one or more web browsers installed, but few have an e-book reader installed. While it is possible to transfer your draft e-book to a hand-held reader for proofing, that is not really a practical arrangement. Typically, you will want to make and re-make you book many times as you refine the settings in Gedcom Publisher, and as you adjust your genealogical database as review of the drafts reveals issues in the underlying data. Installing a reader on your computer for instant review of each draft is the only workable solution.
Fortunately there are a number of free e-book viewers for Windows computers available. Gedcom Publisher Help discusses several in its External Tools page. John recommends "calibre," which is available from the calibre web site, and I recommend it as well. That is the viewer that is used in screenshots in these article.
That "housekeeping" item completed, we move now to actually creating an e-book.
As you enter information into Gedcom Publisher to create your e-book, the program creates a file to save what you have entered. The includes all the information described in the following steps and the accompanying articles, ranging from the name of your book, to the location of your genealogical database, to the contents of custom pages you may create such as the text of an introductory chapter.
Creating the file is simple. From the File menu, choose the New command. A standard Windows "Save As" dialog box opens to the Gedcom Publisher folder that was created in the documents section of your hard drive when the program was installed. Enter a name that reminds you of the book you will be creating, such as "Glabe Family" that I entered for my e-book about my Glabe ancestors. The exact name doesn't matter so long as it is meaningful to you. After you enter the name and click the Save button, the file is created with a ".gpfile" suffix.
You should use the File > Save command to save this file from time to time as you enter information into the program for your book, and you will be prompted to save as you exit the program. When you open the program later to make additions or changes to your book you will re-open this same .gpfile to access the information you have entered in previous sessions. You can do that from the File > Recent Files command, or you can use the File > Open command if you have saved so many gpfiles that the one you want has scrolled off that list.
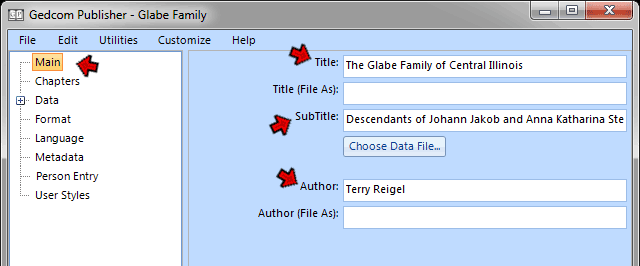
With the gpfile created so that the program can save the information we enter, we next start entering the basic information needed by the program to define our book. Click on the Main section in the left pane of the program interface, and enter some basic data in the fields in the right pane:
In this section we enter:
The Title (File As) and Author (File As) are intended for listing your book in an e-book site. You can ignore them if you do not intend to do that.
Other details, such as publisher name, address,and date, can be entered in the Metadata section if you care to do that.
The last essential step required to enable Gedcom Publisher to create an e-book is to tell it where to find your genealogical data. The program, as its name implies, can read data from a Gedcom file produced by any genealogy program. It even has the ability to utilize the special data included in Gedcom files by a number of programs. For details about these capabilities for various programs see the Application Compatibility section of Gedcom Publisher Help.
The program also has the capability to read the database files of The Master Genealogist directly. TMG users should use that feature rather than using a Gedcom file because it allows the program to access data not present in a Gedcom file, and it avoids the step of creating a new Gedcom file when the database is updated with new information or corrections.
To set the database click the "Choose Data File..." button in the center of the Main section of the Gedcom Publisher interface:
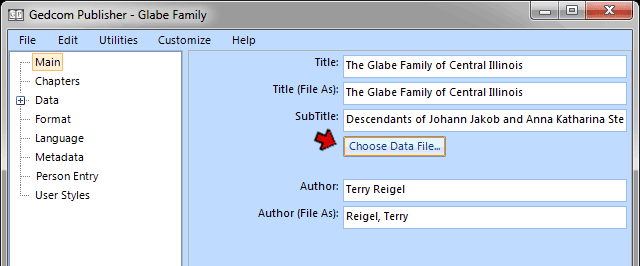
When you click that button a standard Windows Open Files dialog opens. Navigate to the location where the Gedcom or TMG Project file is located, select it, and click the Open button. If using a TMG Project be sure the Project is not open in TMG when you click the Open button.
When you click the Open button the program reads the Gedcom file or TMG Project, and converts the data to its internal format. Once the data is converted the program works only from it, not the original genealogy database files. It refreshes its working data only when you 1) use the File > Reload Data File command to manually refresh the data, or 2) when you re-open the program or re-open the .gsfile.
Second Site users: This is a significant difference from the way Second Site works. It means you do not need to close your TMG Project each time you re-make your e-book. It also means that any edits you make to your TMG data will not be used by Gedcom Publisher until you manually refresh its data file.
We are now ready for our first try at having the program make a draft book. Simply use the File > Make Book command, or the keyboard shortcut Ctrl-M. A status bar is displayed at the lower right of your computer screen:
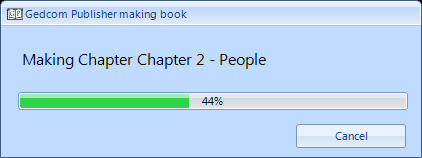
When the status window indicates the process is completed you are ready to view your draft book.
By default Gedcom Publisher includes all people in your database who are marked as deceased. If your database is very large (tens of thousands of people) and you computer somewhat slow you may choose to delay making the book until you have limited the number of people in it as described in my Controlling Who is Included article.
If you have installed an e-book reader as described at the top of this article Gedcom Publisher will open your current book with the File > Browse Book command, or the Ctrl-B keyboard shortcut. Here is what my example book looks like when opened with the calibre reader:

You can use the circled purple arrows on the left side of the calibre screen to browse through the book. Clicking the hand/text pointer a bit above the arrows opens a separate table of contents which is handy for navigating between chapters.
If we advance a few pages we find the Table of Contents page:

The table of contents shows Gedcom Publisher's default "chapters" as they are termed, though the first two are actually just single pages. If we return to Gedcom Publisher and look at the Chapters section, we see the same "chapters" listed.
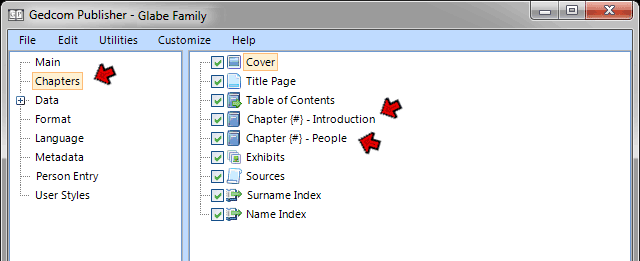
Following the cover, title page, and table of contents, two "content chapters" are listed by default. These are where our genealogical content will be located. The first, titled Introduction, is intended for text and perhaps images and links to content of interest, which must be composed by the reader. The second, titled People, contains all the content from our genealogical database about the people in our book. This last chapter is just a starting point. In practice we will want to separate it into a number of chapters each containing a logical grouping of people.
If you browse through the chapters of your book at this point you will see that both content chapters need more work. The following articles discuss the steps involved:
| ReigelRidge Home | Terry's Tips Home | Contact Terry |
Copyright 2000- by Terry Reigel